I love growing a little bit of everything; and popcorn is one of my favorite toys in the vegetable world. Only problem is: I don’t really have enough space to grow a lot of popcorn; but because it’s so much fun I’ve been hooked on raising it these past several years. Before popcorn I grew some sweet corn, but here in Beautiful West Michigan sweet corn is very plentiful and inexpensive come harvest time.
My garden is about 50 long and about 20 feet wide. As I said, I like to grow a little bit of everything; most of which is in beds rather than rows. Through companion planting and crop rotation, this method has given me pretty good yields over the years.
To save space in the garden, I started off growing only grow one row of corn. However, I found that pollination was not reliable unless I pollinated the corn by hand; which is very labor intensive. These days I plant two rows and pollination has been pretty good.
If you must plant only one row, you’ll need to hand pollinate the corn to get good kernel coverage on each ear. Here’s what I learned: the tassels make the pollen which falls onto the silk to make corn babies. As soon as the silk pokes out of the ears, I skim some of the flowers off the tassel and rub it on the silk. Then I repeat this every couple days or so until a) the tassels quit making pollen or 12) the silk starts to turn brown at the end. This process can be used if you have even less space than I do. In other words, even if you only have enough room for one plant, pollinating the corn by hand will ensure you get cobs full of kernels. If pollination doesn’t happen effectively, you’ll still get a cob but very few kernels.
Here’s a video I made awhile ago that shows how I help the corn pollinate:
Once pollination is finished it’s just a matter of waiting for fall to arrive. I wait for the ears to turn brown; or more accurately a light tan or paper color. Then I make sure I pick them when the weather is dry to prevent molding. Then I pull the husks back (but not off) so the corn will dry.
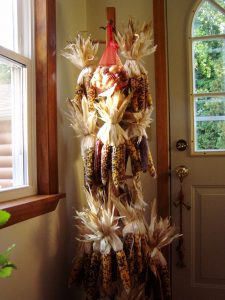
After the husks are pulled back, I’ll lay a length of bailing twine (string works fine too) down on a flat surface; and place 6 to 8 cobs down with the husks positioned so they all lay on top of the twine. Then I pull the twine up and tie the husks together tightly so they can be hung up. I make sure the twine is a bit longer than needed so hanging is easier. Each year I hang the bundles on a coat rack that stands near our pantry. Click the image below for a better look.
I keep the ears in the house to prevent mice from chowing down on my popcorn. After about a month or so the popcorn is dry enough to cook. Before Santa Claus brought me a corn sheller, we’d leave the cobs hanging until we wanted some. Then I’d just pull one cob at a time from its husk (and off the bundle). To remove the kernels, I’d get a deep pan or plastic storage container; then hold the cob toward the bottom of the container and rub my thumb forcefully over the kernels to get them off the cob. Doing it this way prevents kernels from flying all over the place; as they tend to shoot off the cob when they’re dislodged. I’ve learned the hard way that it’s a good idea to wear work gloves while doing this! Otherwise, you’ll get ouchy hands.
Now that I’m blessed with a corn sheller I can process lots of cobs much more quickly. We get about 10 pounds a year, and believe me, you don’t want to shell that much corn with your hands alone.
One good sized ear of popcorn yields enough to make a pretty good sized bowl of deliciousness when popped. We use an air popper, but everyone has their favorite cooking method.
After all that, it’s time to melt about a tablespoon of butter and drizzle it on top; followed by some garlic powder, salt, pepper, maybe even some cumin. Depends on our mood. Then I put a bowl of equal size on the top as a cap and shake until the seasonings are mixed with the popcorn thoroughly.
And you know what?? HOLY MOLY IT’S GOOD!!
Makes you want to settle in and watch a movie or something, doesn’t it??

